
Patented Negative Rake Carbide Cutters are a game changer in the woodworking world. Using these cutters will result in safer and smoother cuts, making it possible to turn super-hard woods and man-made materials without sanding. Also, smooth cuts mean that the job is completed in a shorter time. Negative rake chopper are safer and easier to use than traditional carbide cutters.
Cutting forces can be reduced with positive rake carbide cutters
Carbide cutters that have positive rake angles can lower cutting forces and chip loads. These cutters have a greater chip-reduction ability, since a positive rake cutting blade has a thicker edge than its counterpart. However, the chip-reduction ability of positive rake carbide cutters is only a qualitative indicator, and it depends on other factors, such as the thickness and the strength of the wedge. The positive rake has a thinner wedge that is more susceptible to breakage due to high chip load and vibration. The thinner wedge also breaks down during impact loading, resulting in a poor machining productivity.
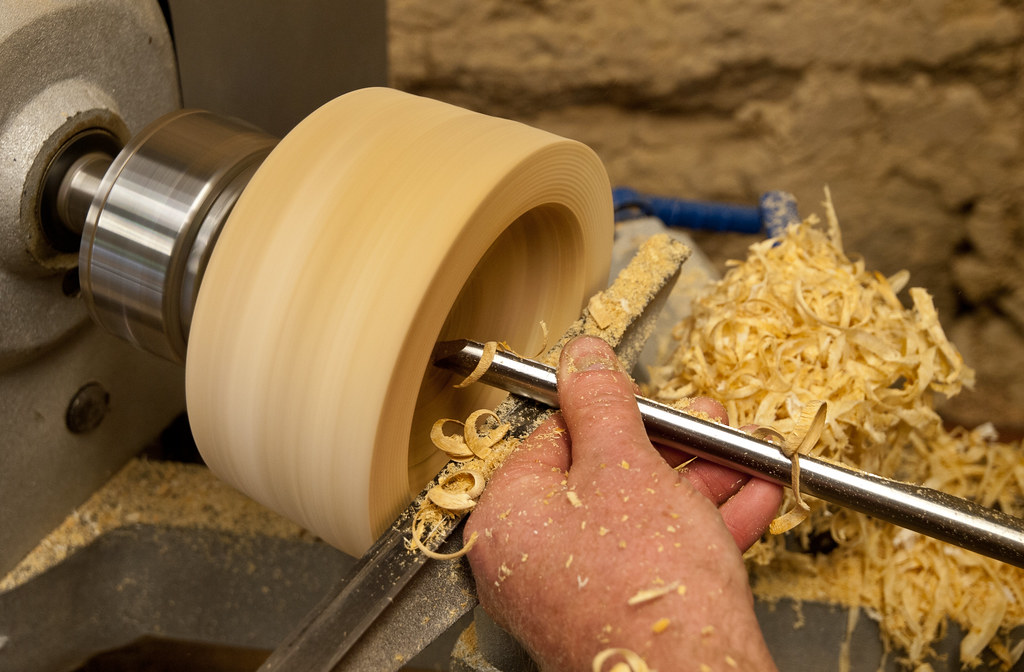
The relative orientation between the cutting face and the work is known as the rake angle. There are two types: negative rake or positive rake. Positive rake means that the angle of the rake is less than 90 degrees. Negative rake carbide cutters have a more blunt cutting edge. Both positive and negative rake carbide cutting tools have their pros.
Cutters made with negative rake carbide yield better results
You can use negative rake carbide cutting tools to create a safe, smooth cut. These tools will make it easy to cut super-hard woods or man-made materials. These tools will cut down on chipping and catching, and make your job much simpler. These cutters will last a lifetime. Average Negative Rake Carbide Cutters will last about 80 hours of continual turning.
Easy Wood Tools created the negative-rake carbide cutter. This type of cutter produces better cuts in hard woods and acrylics while also offering a longer edge life. These cutters come with a 4-40 countersunk machine screws. This carbide cutter comes with the ideal three G's for Carbide. They make a great addition to your woodworking projects.
TiN carbide cutters reduce cutting forces
The cutting forces induced by TiN carbide cutters are reduced compared to conventional tools. However, the forces generated by TiN carbide cutters are not directly proportional to cutting speeds. Process parameters like cutting speed have a larger impact on the cutting force. Therefore, a signal to noise ratio (SNR), model was used. This model can be used to determine the impact of cutting parameters.
Researchers looked at the cutting capabilities of two kinds coated carbide tools. The one with uncoated carbide was examined while the other had Titanium Nitride, (TiN), coating. They used optical microscopy to assess flank and crater wear and machine vision systems to monitor cutting forces. The TiAlN coated carbide tool provided the best response time to cutting forces.
The experiment showed that the temperature changes in TiN-coated Tungsten carbide cutters depending on the cutting parameters. Line I heats up slowly at 280360/min, while Line J heats up quickly at 320440/min. This increase in tooth-feeding rate was responsible for the TiAlN tools' higher cutting temperatures.
Authentic Easy Wood Tool Negative Rake carbide Cutters

The Authentic Hardwood Tools negative rake carbide cutting tools are the best. These tools were made in the USA, and are suitable for use with the Easy Wood Tools Mini or Pro Size Roughers as well as the Micro Detailers. Negative rake carbide cutting tools provide a smoother, more durable finish. They are made with the finest grade of carbide for maximum performance and durability.
Easy Wood Tools Carbide cutters can reduce chipping, catches, or other problems that may arise when working in man-made materials. These cutters reduce chipping, sharpening is unnecessary, and they provide a very smooth finish. The carbide cutting edge is supported directly beneath the workpiece, and this transfers the pressure downward to the wood. Easy Wood Tools negative rake carbide cutters are ideal for woodturning projects.
FAQ
How long does it take you to finish a piece?
It depends on the size of the piece of furniture. You can finish smaller projects, such as boxes or picture frames, in one day. Larger projects, such as desks and dining tables, can take several days. It takes time for the wood to be stained and sealed properly.
What tools are best to begin with when I become a woodworker
Woodworking is an art that takes patience and practice. It takes time to learn how to use all the different tools and techniques required for woodworking.
There are many woodworking tools on the current market. Some prefer power tools while some prefer hand tools.
The choice is yours, but you must ensure you choose the right tool for the job. If you don't have any experience, you may consider starting with a basic set of hand tools.
A router is a tool that cuts intricate shapes in wood. You can also learn how to use it. These can be found at most hardware shops.
How can I learn basic woodworking skills
You can start building furniture by making a bench. You can use any wood you have in your home to complete this project. You don't need to know which type of wood you should use. Instead, get some pine boards at Lowes or Home Depot. After you've constructed your bench you'll want sand all the rough edges off and varnish it.
Statistics
- Overall employment of woodworkers is projected to grow 8 percent from 2020 to 2030, about as fast as the average for all occupations. (bls.gov)
- The best-paid 10 percent make $76,000, while the lowest-paid 10 percent make $34,000. (zippia.com)
- In 2014, there were just over 237,000 jobs for all woodworkers, with other wood product manufacturing employing 23 percent; wood kitchen cabinets and countertop manufacturing employing 21 percent. (theartcareerproject.com)
- Most woodworkers agree that lumber moisture needs to be under 10% for building furniture. (woodandshop.com)
External Links
How To
How to stain wood
The process of staining wood involves the application of chemicals to the wood's surface, which causes it to change its color. The wood will turn from white to brownish-red due to the chemical reaction. The most common type of wood used for staining is oak, although many other types of wood can be stained.
There are many options for applying stains to wood surfaces. You can mix the stain with a solvent, such as turpentine, and spray it onto the wood. Other methods use a solution of water and dye applied directly to the wood. Stains can also be mixed into paints and varnishes, becoming part of the finish coating.
Preparing the wood surface is the first step to staining it. The wood must be thoroughly cleaned to remove all grease and dirt. Sanding smoothens any scratches or rough spots. The next step is to determine the type of stain you would like to use. There are two types of stains that can be used: penetrating and non-penetrating. Penetrating stains penetrate deeper into the wood than non-penetrating ones, making them ideal for dark colors such as mahogany. Penetrating stains are best paired with lighter colors, such as maple.
After deciding on the type of stain, you want to apply, prepare your tools. Paintbrushes are great for applying stain because they allow you to evenly spread the liquid across the surface. A few rags are also handy to clean up any spillages after you have finished painting. If you plan to mix the stain yourself, make sure you have enough containers available to hold the different components of the mixture.
After you have prepared the materials, you can clean the area where you want to stain the wood. To remove dirt and dust, use warm water and soap. Use a dampened sponge and warm water to clean the entire piece. You should remove any debris, especially if your plan is to stain darker wood.
Next, apply the stain. The stain can be applied by spraying or brushing the stain onto one end of the furniture. Slowly and carefully move along the grain of wood, slowly but steadily, until you reach the other end. Make sure that the stain does not drip off the edge of the wood. Allow the stain to dry completely before you move on to the next step.
Protect the painted surface with a coat polyurethane paint sealant. Apply three coats polyurethane sealer. Allow the third coat to dry overnight before sanding the final coat.