If you're a beginner and want to try your hand at whittling, you can start with the basics. You will need a knife and wood. This article will teach you about wood types, tools, and techniques. Once you know the basics you can start your whittling business! There are many types and styles of whittler projects.
Wood
Although there are many types of wood available, the following four woods are the best for whittling. The woods on this list are great for beginners who want to learn how to whittle. There are also various ways to whittle wood to achieve a variety of shapes. These are just a few of the basic methods you can use to whittle wood.
The pull stroke: While carving wood, you need to keep the blade parallel to the grain of the wood. This will prevent the wood from being ripped. You can tell which direction the grain is by looking for dark streaks throughout the wood. These streaks will indicate the direction of your blade when you are whittling wood. The push stroke will cut through wood more effectively than the pull stroke.
Knife
Woodworking is something you can try if you are new. A good place to start is to whittle with a knife. While you may not be an expert at this process, the right technique will give you great control over the knife and make it easier to make detailed cuts. To practice the pull stroke, cut small strips of soap with your knife. Practice makes perfect. Beginning projects are simpler to manage and become more difficult as you move on.

You will need a knife before you start whittling. A pocket knife works well because it's sharp enough for shavings. Avoid knives with large, long blades. These can lead to choking. Choose a knife that has a narrow bevel to make it easier to sharpen. If you need to, you may also want to use a frame saw.
Techniques
There are several techniques that can be used to improve your whittling abilities. The most common cut is the pull stroke, which involves bracing your right thumb on the wood and pinching your right fingers. Then you will draw the knife towards your right thumb while maintaining the knife straight. This stroke is short and controlled, and it gives you a lot of control over the blade. This technique is best for detailed cuts.
There are 2 types of whittling guides. First is the Old Time Whittling book, which is a good reference book if you are a complete beginner. The Little Book of Whittling is another good book that has a large variety of whittling ideas. The Whittling Handbook also has many whittling projects. The Art of Whittling also contains advanced projects. This book contains patterns such as ball and cage, as well as simple puzzles.
Tools
The first step in making whittling tools is to find good wood for your projects. It's possible to use found wood but it is more efficient to get greenwood. Greenwood is easier than drying wood to carve. Deadfall branches can be collected at any time. Small trees can be collected at any time of year, but they're best when you cut them in the winter. Be sure to get permission if you plan on collecting wood from private property.
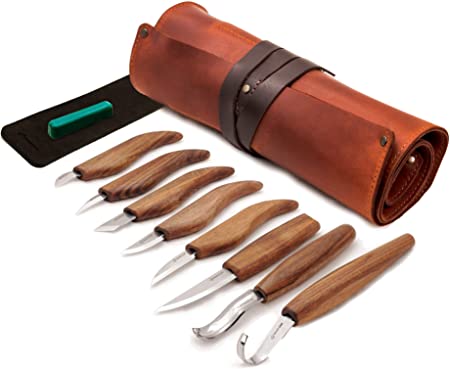
There are many great sets for beginners. One set that is great for beginners is the Delicacy carving set. It includes 12 tools and a blank wood spoon. The set also comes with protective gloves and a carry case. A set of whittling instruments is worth the investment, as you will be using them for many years. This set is an inexpensive way to get started.
Projets for beginners
If you are new to the art of wood whittling, you might want to start with a simple project, like a walking stick. You can work your way up to more complex projects, like carving faces on walking sticks. Comfort Birdie is a bird that can provide comfort for beginning whittlers. Another beginner whittling project is a swan. These make great gifts for children, and they are simple to make even for beginners.
A carved ball in an enclosed cage is another project that can be considered beginner-friendly. You can create intricate designs with feathers, or match your theme with feathers. Tiki idols can also be created. There are so many possibilities. However, it's always a good idea for you to have a template. This will allow you to determine which tools and pieces are needed.
FAQ
How do I determine what kind of wood my project is made from?
Always verify the label on wood purchases. The label should contain information about the wood species, its moisture content, and whether it has been treated with preservatives.
Where to buy Hardwood Lumber
Home Depot sells hardwood lumber. They carry a variety of wood products such as flooring, cabinets, and furniture.
You can also find a large selection of engineered hardwoods like Ipe (Araucaria Angustifolia), Brazilian Cherry, and Mahogany in their collection (Swietenia Macedonilla).
These woods are available online by searching Google for "hardwood lumber".
What tools do I need to start as a woodworker and what should I learn?
Woodworking requires patience and practice. It takes time to master all the tools and techniques involved in woodworking.
There are many different types of woodworking equipment available on the market today. Some people prefer using power tools while others prefer hand tools.
While you have the option to pick what you like, it is essential that you get the right tool for the job. If you don't have any experience, you may consider starting with a basic set of hand tools.
Another option is to learn how to use a router, which is used for cutting intricate shapes into wood. These routers can be purchased at most hardware and home improvement stores.
What kind and type of wood should i use?
Oak, maple, cherry and mahogany are the most common wood types used for woodworking. Each wood variety has distinct characteristics that influence the final product's look and feel. Oak, for example, tends be darker and more hard than other woods. Birch is light and soft, while mahogany can be heavier and more dense. You can also pick between veneers and solid wood. Veneers are thin sheets or wood that are glued together into one layer.
Is it easy to start a woodworking business?
It is not easy to start a woodworking business. There are many laws and regulations you need to be aware of. But, this doesn't mean you need to go through all of the trouble of setting up your business. Many people join already-established businesses. You will only have to pay membership fees, taxes, and other charges.
Statistics
- The U.S. Bureau of Labor Statistics (BLS) estimates that the number of jobs for woodworkers will decline by 4% between 2019 and 2029. (indeed.com)
- The best-paid 10 percent make $76,000, while the lowest-paid 10 percent make $34,000. (zippia.com)
- Most woodworkers agree that lumber moisture needs to be under 10% for building furniture. (woodandshop.com)
- In 2014, there were just over 237,000 jobs for all woodworkers, with other wood product manufacturing employing 23 percent; wood kitchen cabinets and countertop manufacturing employing 21 percent. (theartcareerproject.com)
External Links
How To
Here are some tips on how to drive nails in wood
It is essential to pick the right size and style of hammer before you can drive a nail in wood. There are many types of hammers that you will find: claw hammers and sledgehammers; mallets; ball peen hammers; and hatchets. Each type of tool has its advantages and drawbacks. A claw hammer, for example, is the best choice if you need to hit nails hard. However, it's not easy to know exactly where the impact will land. Although a sledgehammer can be used to hit large areas quickly, it is too heavy to be useful for small tasks.
After choosing the right hammer, place your hand flat against the side of the head so that the handle rests comfortably in your palm. Hold the handle in your hand, but don’t force it too hard that you break. Hold the hammer straight up, keeping your wrist relaxed. You should then swing the hammer straight up, keeping your wrist relaxed. The impact of the hammer hitting the nail should be felt. If you're having trouble getting the hang of swinging a hammer, practice with a block of wood until you get the rhythm down.
Once you are ready to drive the nail, place the hammer close to your body. The nail should be perpendicular to wood's surface. Your eyes should be focused on the nail's tip. Swing your hammer forward. Then follow through with the motions of the hammerhead. This can be repeated several times to increase the speed of your swing. Once you've mastered the technique, try adding power to your swings. Try holding the hammer above your shoulder and bring it down forcefully. You will be able to use more energy and put your best foot forward.
Once you have successfully drilled the first hole in the nail, remove the hammer. Use a pry bar or screwdriver to pull out the rest of the nails. Keep the nail heads parallel to the board's surfaces in order to avoid splitting wood.