Lora S. Irish, an internationally-recognized artist, is the author of many books on carving including The Great Book of Carving Patterns. She also contributes to Woodcarving Illustrated and Scroll Saw Woodworking and Crafts magazines. This article will introduce you to her newest collection of scroll saw patterns: North American Wildlife Patterns. Irish has many publications beyond these books. Lora S. Irish is a popular blogger on Scroll Saw Woodworking.
Lora St. Irish is an international artist
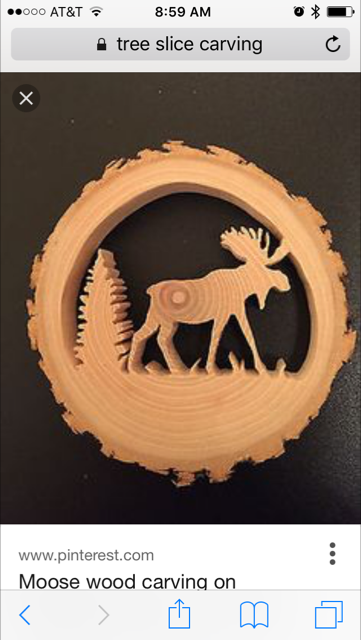
These wildlife patterns are great for scroll saws if you love animals. These patterns are simple and easy-to-follow, with black-filled photos of the cuts. Many of these designs are perfect for wall decorations, but there are also plenty of practical uses for these designs, such as adding interest to shelf braces, accenting top door frames, and decorating basket lids.
The scroll saw patterns included in this book were created to showcase wildlife from around world. More than 50 line patterns are available for you to choose. The patterns are easy and include basic cut instructions. Each pattern has several simple instructions to help you get started, including a six-page gallery of finished designs. Be sure to carefully read the instructions before you cut.
She is also the author of North American Wildlife Patterns: Scroll Saw
This book contains 61 captivating designs for the scroll saw. These patterns provide clear, step-by–step instructions and simple-to-follow lines to cut. The book ships directly from the manufacturer. While you can make a copy of the book for personal use only, you are not allowed to duplicate the pattern for distribution or resale. However, you may photocopy or scan the patterns for use on other machines.
This book is written by renowned artist Lora S. Irish. These 61 patterns include bears, birds, deer and dragons. This guide provides detailed instructions for choosing blades as well as making both inside and exterior cuts. Instructions also include tips for modifying the patterns to fit your needs. Irish's artistic works span several mediums, including wood carving, and are well-known for their intricate relief carving patterns. Her books have been featured by many magazines, and they are highly recommended.
FAQ
What kind of wood should I use?
Oak, maple, cherry and mahogany are the most common wood types used for woodworking. Each wood type has its own characteristics which affect the final product's appearance and feel. For example, oak tends to be darker and harder than other woods. Birch is soft and light, and mahogany is denseer and heavier. You also have the option of solid wood or veneers. Veneers are thin sheets or wood that are glued together into one layer.
What time does it take for furniture to be finished?
It all depends upon the size of your piece of furniture. A smaller project like picture frames or boxes can be completed in a single day. Larger projects, like desks or dining tables require several days. It takes time for the wood to be stained and sealed properly.
Is it difficult to start my woodworking business?
It is not easy to start a woodworking business. There are many requirements and regulations that must be followed. It doesn't mean that you have to go through the entire process of starting a business. Many people opt to join existing businesses instead. This will allow you to avoid paying membership fees and taxes.
What wooden items sell well?
The best-selling wooden items are those which have been made from wood that was harvested sustainably.
The most popular types of wood for furniture include oak, maple, cherry, mahogany, walnut, and teak.
These woods not only have great strength, but also beautiful patterns and colors. They also last for many years if cared for properly.
To protect wooden furniture from moisture damage, you should paint it first. This covers all surfaces, drawers included, as well as doors and handles.
If you want to make sure that your furniture lasts as long as possible, then you should choose a paint that is resistant to water.
It is recommended to use an oil-based primer, then apply two coats. Depending on how much wear you expect, you might need to apply more coats of topcoat.
Spray cans or aerosol paints should be avoided. These products contain solvents that evaporate quickly and leave behind harmful fumes.
Statistics
- The U.S. Bureau of Labor Statistics (BLS) estimates that the number of jobs for woodworkers will decline by 4% between 2019 and 2029. (indeed.com)
- In 2014, there were just over 237,000 jobs for all woodworkers, with other wood product manufacturing employing 23 percent; wood kitchen cabinets and countertop manufacturing employing 21 percent. (theartcareerproject.com)
- The best-paid 10 percent make $76,000, while the lowest-paid 10 percent make $34,000. (zippia.com)
- If your lumber isn't as dry as you would like when you purchase it (over 22% in Glen Huey's opinion…probably over 10-15% in my opinion), then it's a good idea to let it acclimate to your workshop for a couple of weeks. (woodandshop.com)
External Links
How To
Tips for driving a nail in wood
To drive a nail into wood, the first step is to select the right size and type hammer. The most common types of hammers are claw hammers, sledgehammers, mallets, ball peen hammers, and hatchets. Each type of hammer comes with its advantages and disadvantages. A claw hammer, for example, is the best choice if you need to hit nails hard. However, it's not easy to know exactly where the impact will land. Although a sledgehammer can be used to hit large areas quickly, it is too heavy to be useful for small tasks.
After selecting the right hammer, you will need to place your hand flat against one side of the head. The handle should rest comfortably in your hands. Hold the handle in your hand, but don’t force it too hard that you break. Your wrist should be relaxed while you hold the hammer straight upwards. Next, swing the hammer toward the ground and aim for the nail's center. You should feel the impact on the nail from the hammer. You can practice swinging the hammer with a block or wood until you feel the rhythm.
The hammer should be held close to your body when you are ready to begin driving the nail. To ensure that the nail is perpendicular on the surface of the wooden floor, position it. Keep your attention on the tip. Swing the hammer forward, and then move the hammerhead. This can be repeated several times to increase the speed of your swing. Once you have mastered this technique, increase the power of your swings. You can hold the hammer over your shoulder and forcefully bring it down. This will allow you to exert more energy.
Once you have made the first hole, remove your hammer. The rest of the nails can be pulled out using a screwdriver, pry bar, or a hammer. To avoid splitting the wood, make sure the nail heads are not touching the board's surface.