This article will cover Basic Whittling cuts and Knife Blades for Whittling. I also discuss wood for whittling. I'll also be discussing how to maintain your whittling blades. I will show you how to pick the best whittling tool for your purpose. Now, let's get started! Here are some of the most popular whittling cuts.
Basic whittling cuts
To be able to whittle any project you need to know the basics. You will be able to use the knife with greater control and produce more beautiful carvings. Straightaway rough cuts can be used to carve out the basic shape of your project. This method is the most basic.
This cut is sometimes called the paring knife. To visualize it, imagine yourself peeling an Apple or Potato. Your thumb should be firmly anchored in the wood. Next, use your knife and your thumb to pull at your thumb. To create this motion, close your fingers tightly. This produces close details. The push cut is another basic whittling tool. This cut requires applying firm pressure while drawing down. The wood will guide your hand as you do this to reduce fatigue.
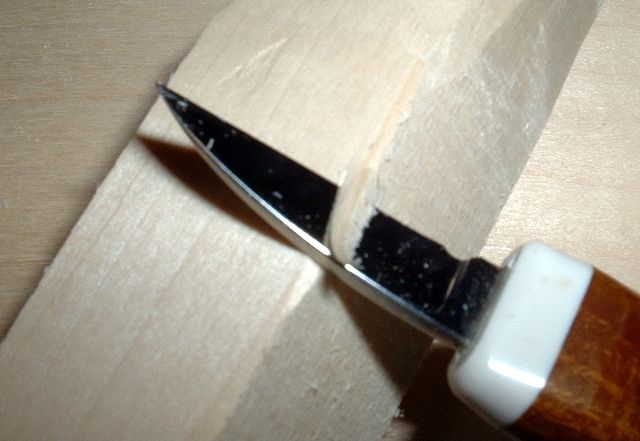
Knife blades that are suitable for whittling
A high-quality wooden whittling blade is a must-have for anyone who is learning how to make whittling cut. A quality knife should be comfortable to grip for long periods of times, have excellent quality and be made from durable materials. The Morakniv scores well in all of these categories. Although it might not be the best choice for beginners, this knife is suitable for woodcarvers of all levels and is inexpensive enough to purchase.

Mora makes a high-quality, high-quality whittling knives. It's made from durable laminated and tempered steel. The tapered tip means that it needs very little sharpening. The handle is made from oiled birchwood and is comfortable for all hands. The oversized handle also enhances control of the blade. The lanyard and cap can be reversible.
For whittling, you will need wood
Whittling is a great skill for those who enjoy camping, hunting and outdoor activities. Whittling isn't just for campers. It can also be a great hobby for carpenters who don't have their own workshop. A knife and wood are the two most important tools for whittling. This article describes how to use these two main tools for whittling.
Woodcarving projects usually show a finished product. Whittling, however, is more appealing to people who value the natural beauty inherent in wood. Whittlers pick up wood on walks and immediately carve it using a knife. It's a wonderful way to express your artistic side and not need a large table or dining room. This guide will help to learn these basic cutting skills.
Maintaining whittling knives
You need to take special care of Whittling knives. The blades should be cleaned by professionals using a damp cloth. They should be kept cool and stored in a dry place. After use, wipe them clean to prevent rust. It is vital to keep them sharp and prolong their lifespan. It is important to clean your whittling tools regularly. If you aren't sure how to sharpen them, check out these tips.
Safety is the most important aspect of buying a whittling blade. Whittling is supposed be relaxing and meditative. But it can be dangerous to rush through. Cut slowly and carefully. You will get better cuts with a sharp blade. A dull blade tends to flick off the wood and head towards your hand. If this happens your knife will still remain sharp enough to slice your flesh.
The health benefits of whittling

Whittling provides a great therapy and allows for you to be focused on relaxation. The sounds of a sharp blade cutting wood are relaxing and provide a welcome distraction to the hustle and bustle in the modern world. The process is enjoyable and the results are easy. The many health benefits of cutting cuts are numerous but the most important is its impact on the mind.
A pocket knife is essential for the whittling. It should be sharp enough to produce shavings. But be careful with knives with large, broad blades. You may be able to cut yourself or choke if you use these knives. A narrower bevel pocket knife will decrease your chances of choking. Although the blades of whittling knife blades aren't dangerous, it is recommended to use a knife with an locking mechanism.
FAQ
Are there any other things I should know regarding woodworking?
It is easy for people to overlook the work involved in furniture making. Finding the right type of wood is the most difficult aspect of this process. There are so many wood options that it can be difficult to choose the right one.
Another problem is that not all wood has uniform properties. Wooden can split or crack, while some woods may warp. Before purchasing wood, you should consider these factors.
How much do hobbyists need to invest in starting a business?
If you're looking to start your own woodworking business, you'll probably need some capital to buy the necessary tools and supplies. You can start by purchasing a small table saw and drill press as well as a circular saw, circular saw, jigsaw and sanding machines. These items are affordable so you won’t break the bank.
How often should I get new supplies?
You'll probably have to replace some of your tools over time. You'll need to sharpen your hand tools regularly if you use them. For power tools, replacement parts will be required frequently. Spread your purchases over several months to avoid purchasing too many items at once.
Can you teach yourself woodworking?
The best way to learn anything is by doing. Woodworking is an intricate art form that requires practice, skill, patience, and experience. Mastering any craft takes time.
It is the best way to learn to do something is to actually do it. Start small, and work your way up from there.
Is it easy to start a woodworking business?
Starting your own woodworking business isn't easy. There are many requirements and regulations that must be followed. However, it doesn't necessarily mean you must go through all the hassle of setting up a business. Many people choose to join existing businesses. You will only have to pay membership fees, taxes, and other charges.
What kind tools do carpenters use to build?
A hammer is probably the most widely used tool for carpenters. A hammer helps to carpenter pound nails into the wood. It is also used to help hold pieces together while working on a job. Other tools include clamps.
What tools work best for me?
It's important that you consider your needs and preferences while shopping for tools. Do you prefer metal or plastic handles? What size screws and nails do you use most often? Do you prefer hand tools over power tools?
Statistics
- If your lumber isn't as dry as you would like when you purchase it (over 22% in Glen Huey's opinion…probably over 10-15% in my opinion), then it's a good idea to let it acclimate to your workshop for a couple of weeks. (woodandshop.com)
- Woodworkers on the lower end of that spectrum, the bottom 10% to be exact, make roughly $24,000 a year, while the top 10% makes $108,000. (zippia.com)
- Average lumber prices rose about 600 percent between April 2020 and May 2021. (familyhandyman.com)
- In 2014, there were just over 237,000 jobs for all woodworkers, with other wood product manufacturing employing 23 percent; wood kitchen cabinets and countertop manufacturing employing 21 percent. (theartcareerproject.com)
External Links
How To
How to stain wood
The process of staining wood involves the application of chemicals to the wood's surface, which causes it to change its color. This chemical reaction causes wood to turn from whiteish to brownish. Oak is the most commonly used wood for staining, but other woods can also be stained.
There are several ways to apply stains to wood surfaces. One method involves mixing the stain and a solvent and then spraying it on the wood. Other methods use a solution of water and dye applied directly to the wood. You can also mix stains with varnishes or paints so that they become part the finish coating.
The first step in staining wood is preparing the surface. To apply the stain, clean the wood completely. Sanding the wood removes scratches and imperfections. You must then decide on the type of stain that you wish to use. There are two basic kinds of stains: penetrating stains and non-penetrating stains. Penetrating stains penetrate deeper than non-penetrating stains, which makes them great for dark colors like mahogany. Light colors such as maple work well with non-penetrating stain.
After choosing the type and application method you prefer, gather your tools. Paintbrushes are great for applying stain because they allow you to evenly spread the liquid across the surface. A few rags are also handy to clean up any spillages after you have finished painting. If you plan to mix the stain yourself, make sure you have enough containers available to hold the different components of the mixture.
After you have prepared your materials for staining, clean the area. You can remove grime and dirt with warm water and soap. You can wipe down the entire furniture using a damp rag with clean water. If you intend to stain darker wood, make sure you get rid of any debris.
Next, apply the stain. Begin at one end and spray or brush the stain on the wood. Slowly and carefully work your way along the grain to reach the opposite end. Keep the stain from dripping off the wood's surface. Before you proceed with the next steps, let the stain dry completely.
Protect the painted surface with a coat polyurethane paint sealant. Three coats are recommended for polyurethane. Let the third coat dry overnight before you sand the final coat.