If you're a beginner and want to try your hand at whittling, you can start with the basics. Choose wood, a knife, and some tools. This article will explain the differences between different types of wood and how to use them. Once you've got the basics down, you can start your own whittling project! There are many types and styles of whittler projects.
Wood
Although there are many types of wood available, the following four woods are the best for whittling. The woods on this list are great for beginners who want to learn how to whittle. There are many methods to whittle wooden pieces to make different shapes. Below are some basic techniques for whittling hardwood.
Pull stroke: Keep your blade parallel to wood grain when carving. This will keep the wood from being torn. Look for dark streaks through the wood to determine the direction of grain. These streaks will indicate the direction of your blade when you are whittling wood. The push stroke will cut through wood more effectively than the pull stroke.
Knife
If you are just starting out in woodworking, it can be fun to practice your skills by using a knife to cut. While you may not be an expert at this process, the right technique will give you great control over the knife and make it easier to make detailed cuts. For example, you can practice the pull stroke by cutting small strips of soap with a knife. Practice makes perfect. Beginner projects are easier to handle and get more challenging as you progress.
Before you begin whittling, a knife is essential. A pocket knife is perfect as it is sharp enough that you can make razor-sharp shavings using a sharp blade. Avoid knives that have long, sharp blades. They can cause choking and should not be used for this purpose. Instead, pick a knife with a narrow bevel, which will make it easier to hone. You can also use a frame saw if necessary.
Techniques
These techniques can help you improve your skills in whittling. The pull stroke is the most common. It involves bracing the right thumb against the wood and pinching the right fingers. Next, draw the knife to your right thumb while keeping it straight. This stroke is fast and controlled and allows you to have a lot more control over the blade. This technique is best for detailed cuts.
There are two primary types of whittling books. First is the Old Time Whittling book, which is a good reference book if you are a complete beginner. The Little Book of Whittling, which has a wide range of whitling tips and tricks, is another great book. The Whittling Handbook also has many whittling projects. The Art of Whittling has some advanced projects. This book also contains simple puzzles, such as the ball and cage patterns.
Tools
Good wood is essential for making whittling tool. While it is possible to use existing wood, it is much better to gather greenwood. Greenwood is easier than drying wood to carve. You can also collect deadfall branches at any time of year. Small trees can be collected at any time of year, but they're best when you cut them in the winter. If you're working on private property, ask permission before collecting wood.
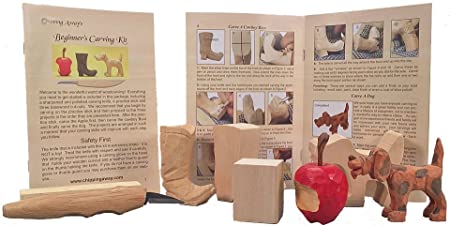
You can find some fantastic sets if you are just starting out. The Delicacy carving kit includes 12 tools, an empty wooden spoon blank and a knife sharpener. The set comes with protective gloves as well as a case. You'll use them for a long period of time so it's worth investing in a set. This set can also be used to start.
Beginner projects
You might start out with a simple project like a walking stick if you're new to wood whitling. You can progress to more complicated projects like carving faces on walking stick. A bird like the Comfort Birdie may be a good choice for beginners. A swan is an excellent beginner project in whittling. These are wonderful gifts for children and are very easy to make.
A carved ball inside a cage is another beginner project. You can create intricate designs and use feathers to match your theme. Tiki idols can also be created. The possibilities are endless, but it's always a good idea to have a template before you begin. This will help you to know which pieces and tools are appropriate.
FAQ
How long does it take to finish a piece of furniture?
It all depends on what type of wood you use, how complex your design is, and how much finishing you use. For example, hardwoods require more maintenance than softwoods. Hardwoods tend to be more expensive that softwoods. However, they are stronger and more resistant to moisture. It takes between one and three months to finish a piece.
What's the difference between plywood vs particle board?
Plywood consists of layers made from wood and pressed together by pressure. Plywood is available in a variety of thicknesses. It is often used to make cabinets or flooring. Particle board consists of sawdust mixed and resin. The resin is then compressed into large blocks. This board is commonly used in home improvement projects. Both boards are strong and can be easily cut.
How can a beginning woodworker make a living?
Many people learn how to make furniture in order to set up an online business. There are other ways to make money if you're just starting out building furniture than selling on Etsy. You could also sell at craft fairs, or other local events. Offering workshops could be another option for those who are interested in learning how to build their furniture. Consider offering your services if you have previous experience as a builder or carpenter.
How do I identify the type of wood that I am dealing with?
Always read the label when purchasing wood. The label should include information about the wood species and its moisture content as well as whether or not it has been treated using preservatives.
What else should I know about woodworking in general?
It's easy to underestimate the amount of work involved in making furniture. The hardest part of the process is actually finding the right wood. It is difficult to choose between the various types of wood.
Another problem is the fact that not all wood has the same properties. Woods can warp, split, or crack over time. Before purchasing wood, you should consider these factors.
Statistics
- Overall employment of woodworkers is projected to grow 8 percent from 2020 to 2030, about as fast as the average for all occupations. (bls.gov)
- Most woodworkers agree that lumber moisture needs to be under 10% for building furniture. (woodandshop.com)
- Average lumber prices rose about 600 percent between April 2020 and May 2021. (familyhandyman.com)
- The U.S. Bureau of Labor Statistics (BLS) estimates that the number of jobs for woodworkers will decline by 4% between 2019 and 2029. (indeed.com)
External Links
How To
How to stain hardwood
Stain wood is a process that involves applying chemicals to the surface of wood, which changes its color. This chemical reaction causes wood to turn from whiteish to brownish. The most common type of wood used for staining is oak, although many other types of wood can be stained.
There are many ways to stain wood surfaces. Some methods involve mixing the stain with a solvent (such as turpentine) and then brushing or spraying the mixture onto the wood. Others use a solution made up of water and dye, which is then applied directly onto the wood. You can also mix stains with varnishes or paints so that they become part the finish coating.
Preparing the surface for staining wood is the first step. You must clean the wood well to remove any grease or dirt that might interfere with the application of the stain. Sanding smoothens any scratches or rough spots. Then you must decide what kind of stain you want to use. There are two main types of stain: non-penetrating and penetrating. Penetrating stain penetrates deeper into wood than nonpenetrating, making them suitable for dark colors like mahogany. Non-penetrating stains work best with light colors like maple.
After choosing the type and application method you prefer, gather your tools. You can use a paintbrush to apply stains. This allows you spread the liquid evenly over the surface. It is a good idea to have rags on hand in case you need them to clean up any stains that may remain after you have finished painting. If you plan on mixing the stain yourself make sure that you have enough containers to hold the different components.
Once you have prepared your materials, start by cleaning the area where you plan to stain the wood. To remove dirt and dust, use warm water and soap. Wipe the entire piece of furniture with a rag dampened with clean water. Make sure you eliminate any loose debris, especially if you plan to stain darker wood.
Apply the stain. Apply the stain by brushing or spraying it onto one side of the furniture. Work slowly and carefully, moving back and forth along the grain of the wood until you reach the opposite end. The stain should not drip off of the wood's edge. Before proceeding to the next step, let the stain dry thoroughly.
Apply a clear polyurethane sealant to protect the painted surface. Three coats are recommended for polyurethane. Let the third coat dry overnight before you sand the final coat.